
This post details my observations and experiences Implementing Ubiquiti Unifi into the home network. If you intend to use Unifi devices exclusively then the kit will work straight out the box with little configuration required, no point in reading this post TL;DR.
On the other hand if you have a fairly elaborate home network which resembles a tiny enterprise then read on as you may be interested in my findings.
The problem I was trying to solve
I’ve been using the Unifi AC Pro AP’s for a couple of years and they’ve been awesome. Recently a strange issue with my ISP’s cable modem / router required some attention as it was becoming annoying. At times the ‘Superhub’ would just stop passing traffic resulting in loss of internet access. The superhub would still respond from the LAN interface and I could log into it via the web UI but it would not pass traffic to or from its WAN port. The issue was only resolved by power cycling the modem.
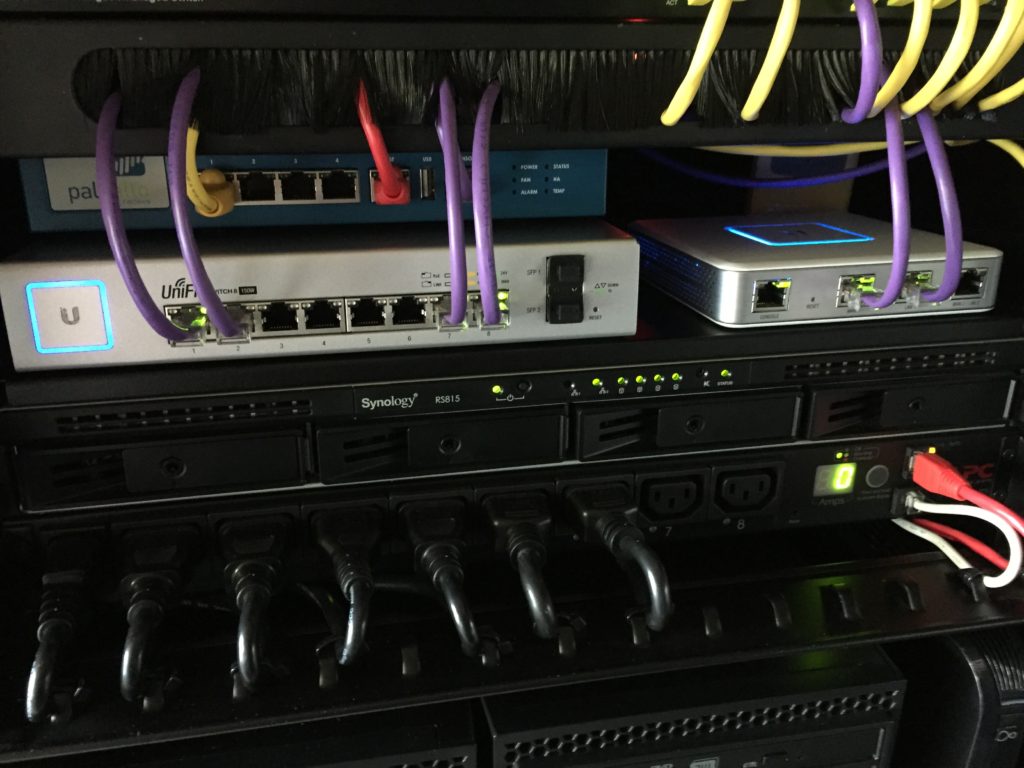
Anyway, I’d been waiting for the opportunity to play around with some more Unifi kit for ages. My plan was to install a Unifi Security Gateway (USG) and Unifi 8 port Switch. The ISP’s router would be turned into modem only mode, passing the public IP straight through to the USG.
Physical Topology
To understand how the Unifi kit has been deployed into my home network I need to explain the physical and logical topology to provide some context.
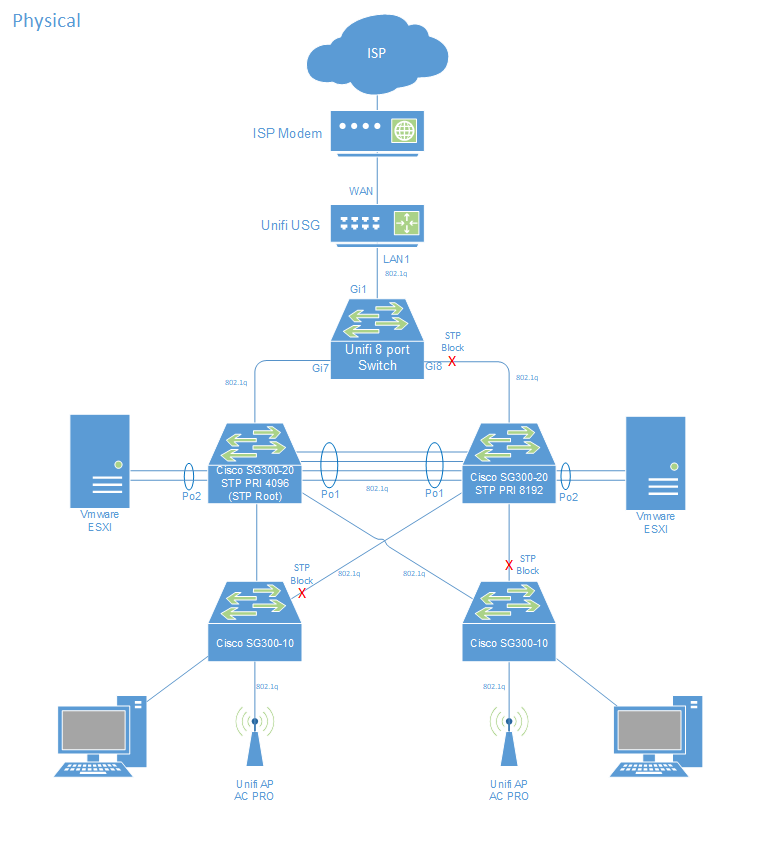
The 8 port switch deployed in the topology in this way removes a failure scenario of loosing one of the SG300’s. Upon failure spanning tree re converges and traffic resumes. Sure, the 8 port switch is a SPOF (Single point of failure) but only from a north south (internet) traffic flow perspective. Loosing a core switch due to firmware upgrade, failure or whilst running testing scenarios will ensure north south traffic is not interrupted.
I also use a couple of Cisco SG300 10 port POE switches as the access layer. Each SG300-10 connects to both SG300-20 core switches. The design accounts for SPOF up to the 8 port USG switch. In the near future I intend to use a 4G provider as a backup ISP removing all SPOF in my home network.
Two Palo Alto VM100 virtual firewalls in HA act as the core routers for my home network and lab. The VM’s run on two VMware ESXI servers. Both servers connect to one of the SG300 20 port switches in use as core switches. The Unifi 8 port switch connects to each of the SG300-20’s with one of the ports on the Unifi switch in STP block. Its a shame the Unifi USG can not be configured to use both LAN ports in bridge mode. If this were possible I’d have probably not bothered with the 8 port switch and just patched each of the LAN ports on the USG into the Cisco SG300’s.
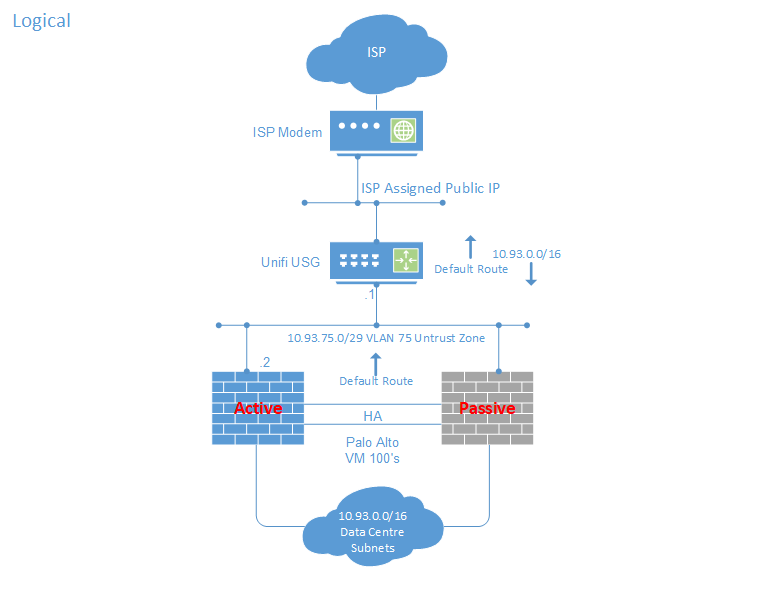
Logical Topology
The logical topology diagram below details the routing. The USG has a static route pointing at my Palo Alto firewalls for the supernet used by my home network. Please note all IP’s used in this post are for illustration purposes and not my actual IP’s 🙂
Why even bother with the USG?
You might ask why even bother with the USG? why not just pass the DHCP assigned address from the ISP to a virtual nic on the Palo Alto firewalls? I’m just not comfortable with allowing Internet traffic through to my x86 servers using vlans onto the same hardware inside my network. Some people dedicate physical network adaptors to the WAN ports on their virtual firewalls, that is an option and probably a safer one. I also know of people that run dedicated x86 servers for the perimeter / internet edge NFV virtual devices.
That option seemed more hassle to me and far more expensive in terms of power consumption, licences and extra tin required. The USG was a little over £100 and is very low power to run. Its also a little reassuring to have two vendors of firewalls in place in case of vulnerabilities found with either of them.
Now we have some context lets get into the setup.
Initial Provisioning
Default IP – Unless you use the default IP subnet assigned out of the box by the Unifi devices you’ll need to change it. I run a separate dedicated vlan to manage my equipment, the Unifi controller is also on that same vlan (The unifi devices and controller need to be on the same broadcast domain within a site). To change the IP on the USG this Ubiquiti article details how.
Connect to the USG on its default IP by connecting directly to LAN1, SSH into it and change the IP using the below commands obviously replacing the IP’s with your own:
configure
set interfaces ethernet eth1 address 10.0.0.1/24
delete interfaces ethernet eth1 address 192.168.1.1/24
commit
Once the IP is changed the USG will appear in the controller to be adopted. Configuring the USG via the CLI was like putting on a comfy pair of slippers. I’ve had some experience working with VyOS which is a fork of Vyatta. Ubiquity’s EdgeOS is based on Vyatta.
Managed via default un-tagged VLAN
Unifi devices support 802.1q but management is via the default un-tagged vlan. On my Cisco SG300’s this is easily achieved with native vlan command:
CS-NA1-PHY-01#sh run int gi19
interface gigabitethernet19
 description AS-NA1-PHY-04_Gi7
 switchport trunk allowed vlan add 75
 switchport trunk native vlan 90
USG no upgrade without active WAN port
Ideally all newly provisioned devices should be running the latest supported and recommended version of software. Once the USG had been adopted into my controller I attempted to upgrade directly from the controller. The upgrade would appear to be working, the USG would reboot but it always came back online with the firmware it was shipped with and no error messages.
Using my Google-Fu I discovered that the USG requires the WAN port to be up and have internet access. The firmware is pulled down by the USG directly from the Ubiquiti CDN and not pushed to it by the controller. You can upgrade the USG using the CLI. This is hardly living the SDN dream though right?
I configured the WAN port on the USG with a temporary internal IP inside of my LAN. The USG was then able to reach the internet and pull down its firmware. I guess if you connected the USG’s WAN port directly to your ISP’s modem straight out of the box then you would not see this issue. I wasn’t ready to start using the USG as a production device until I’d completed some performance and security tests.
NAT not configurable via controller
Like I said at the start of this post, if you use the Unifi devices exclusively and all vlans and subnets are visible and configured via the controller then happy days. Although NAT is not currently a configuration option in the controller, NAT on egress (WAN) statements are added automatically to address groups during the provisioning process. Except, in my case not all networks and vlans are configured on the Unifi devices. Most of my networks live behind a Palo Alto firewall. Strange how you can configure static routes via the controller to the USG for networks not directly connected, but no option to include those networks in the NAT on egress configuration.
In short, although NAT configuration on the controller is on the Ubiquity roadmap, at the time of writing this post it was not an option. I needed to create a JSON file which is stored on the controller and pushed by the controller to the USG each time a configuration is made (provisioning). Ubiquity have a great post on how to achieve this.
If your interested this is the process I followed to configure NAT on my USG for all subnets in my home network. You need to use a rule number that is below 6000 for your custom entries.
Step 1)
SSH to the USG and enter the following commands:
Configure
set service nat rule 5001 description 'NAT DC Subnets to WAN'
set service nat rule 5001 log disable
set service nat rule 5001 outbound-interface eth0
set service nat rule 5001 protocol all
set service nat rule 5001 source address 10.93.0.0/16
set service nat rule 5001 type masquerade
commit;save;exit
Step 2)
Get a dump of the running config in JSON format by issuing the following command on the USG:
mca-ctrl -t dump-cfg
This will show you the whole config, you only need to pull out the section relevant to your coniguration. In my case this was NAT. You need to ensure that you have all the elemements relevant to the JSON format. Below is the JSON file I uploaded to my controller:
{
       "service": {
                "nat": {
                        "rule": {
                                "5001": {
                                        "description": "NAT DC Subnets to WAN",
                                        "log": "disable",
                                        "outbound-interface": "eth0",
                                        "protocol": "all",
                                        "source": {
                                                "address": "10.93.0.0/16"
                                        },
                                        "type": "masquerade"
                                },
                                "6001": {
                                        "description": "MASQ corporate_network to WAN",
                                        "log": "disable",
                                        "outbound-interface": "eth0",
                                        "protocol": "all",
                                        "source": {
                                                "group": {
                                                        "network-group": "corporate_network"
                                                }
                                        },
                                        "type": "masquerade"
                                },
                                "6002": {
                                        "description": "MASQ remote_user_vpn_network to WAN",
                                        "log": "disable",
                                        "outbound-interface": "eth0",
                                        "protocol": "all",
                                        "source": {
                                                "group": {
                                                        "network-group": "remote_user_vpn_network"
                                                }
                                        },
                                        "type": "masquerade"
                                },
                                "6003": {
                                        "description": "MASQ guest_network to WAN",
                                        "log": "disable",
                                        "outbound-interface": "eth0",
                                        "protocol": "all",
                                        "source": {
                                                "group": {
                                                        "network-group": "guest_network"
                                                }
                                        },
                                        "type": "masquerade"
                               }
                       }
                 }
       }
}
Step 3)
The JSON file must be validated to ensure its in the correct format or you may cause a boot loop on the USG. You can validate the format of your JSON file by using the following Python command:
python -m json.tool config.gateway.json
Step 4)
Now copy the file to the location required by the controller. My controller is installed on a Ubuntu VM. The name of the file must be config.gateway.json
/usr/lib/unifi/data/sites/default/
Step 5)
You need to either change a setting for the USG on the controller to trigger a provision or click the force provision button. The provisioning process pushes out the config in the JSON file to the USG. Make sure you try a reboot of the USG to ensure it comes back on line with all the configuration you need. Should something go wrong and the USG gets stuck into a boot loop just delete the JSON file from the controller.
Performance Testing
The first test was performance. The USG is fast. An iperf test between two workstations, one connected the the LAN1 port and one to the WAN port revealed very satisfactory performance:
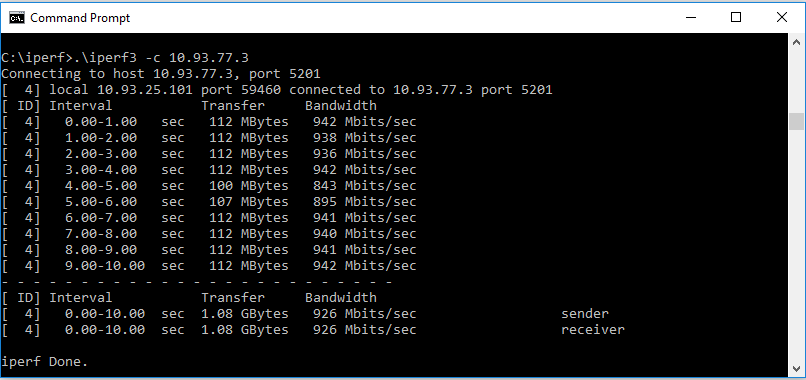
DPI was then enabled on the USG and retested to see if there was much of an impact:
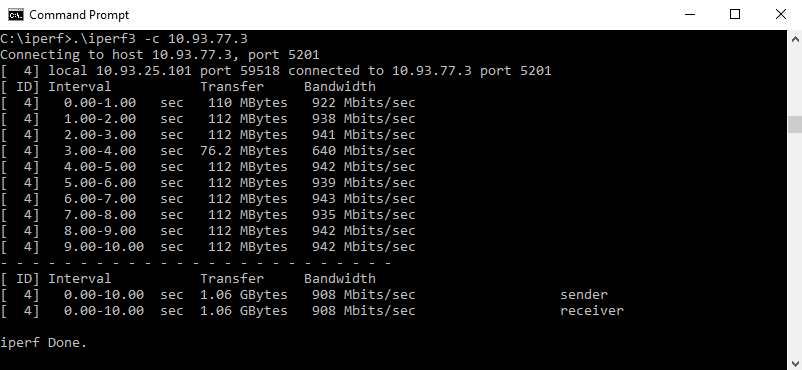
Ok, I was only testing with iperf. I guess a mixture of application traffic might affect the performance differently but all the same, Its still impressive to see over 900Mpbs on a 1Gbps link with DPI enabled. I think the level of visibility you get from applications in use on your network for such a small penalty on performance is worth it.
By tuning the iperf tests and possibly using Linux OS for the testing I could probably have got the USG to go even faster. Perhaps even close to line rate. I was happy with +900Mpbs given my ISP download rate is 350Mbps.
Security Testing
Nessus was used to test the USG with my required configuration. Other than the expected ports being open which were configured in the port forwarding, all was good.
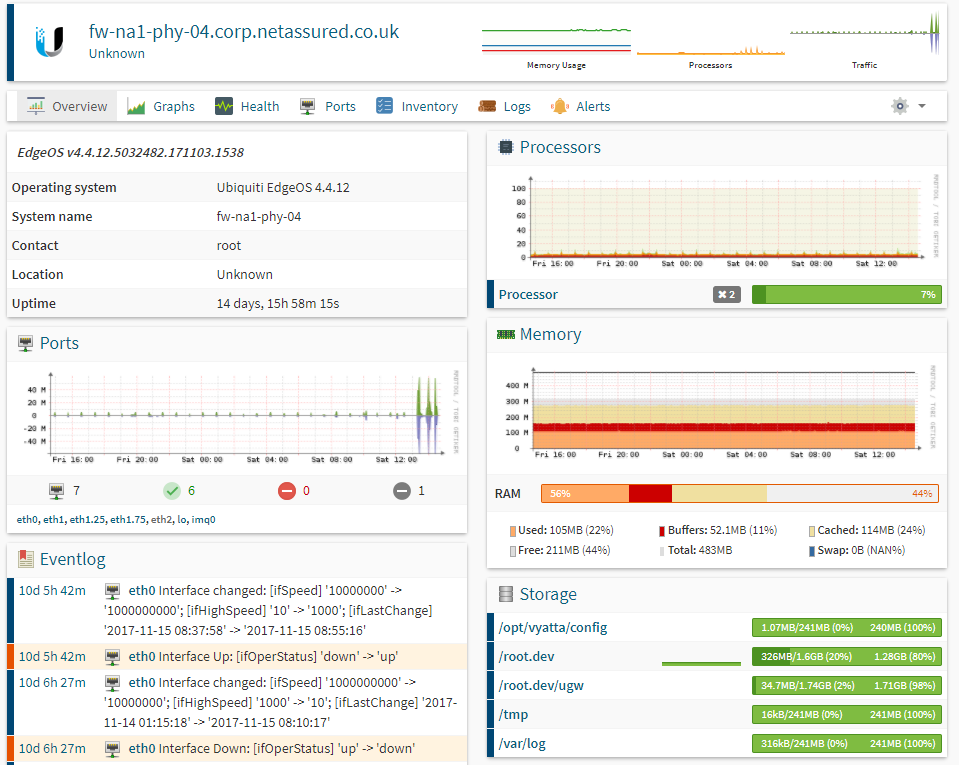
Monitoring
I use Observium to monitor devices in my home lab. Once SNMP was configured in the controller software polling began on the USG and the Switch with Observium.
After a week of monitoring all looks good from CPU and memory utilization for both the USG and the 8 port switch:
USG
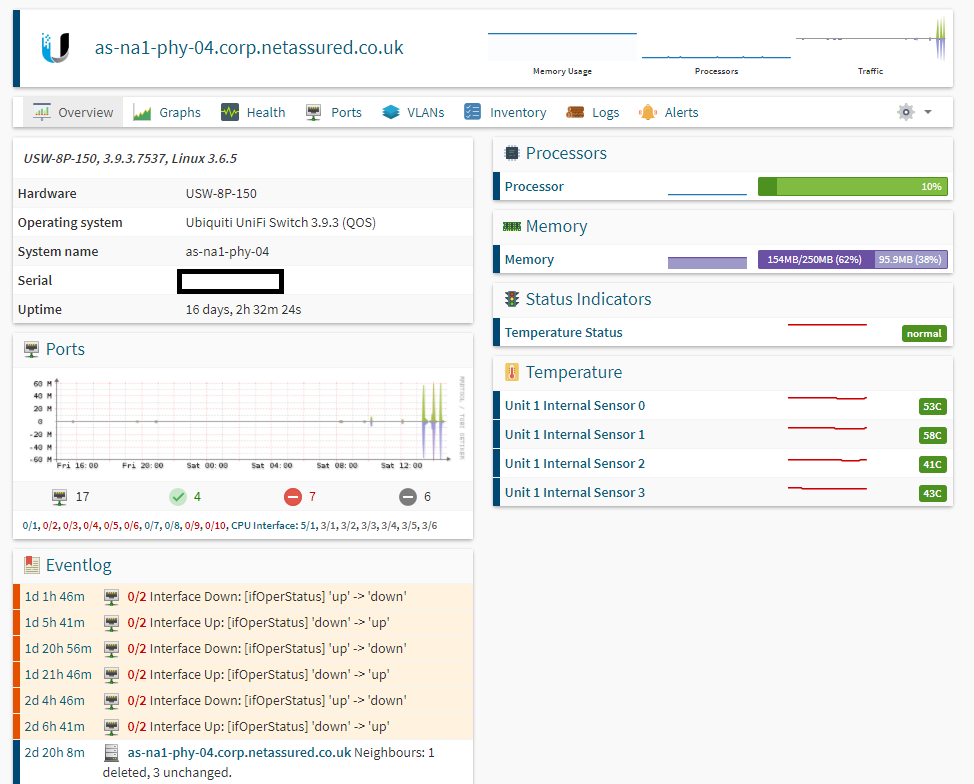
Switch
Configuration Management
The Unifi controller holds all the configuration for devices it manages. At the time of writing this post only a single USG can be managed by the Unifi controller. Sad Panda. There is currently no option to have active standby HA topology’s for USG’s. Hopefully this is something Ubiquity plan to address in the near future. Even small enterprises might require the ability to account for SPOF.
Should a USG fail and require hardware replacement all you need to do is instruct the controller to ‘forget’ the old USG then adopt the new USG. The configuration will then be provisioned to it. Cool, no separate backups of the USG required.
To replace a failed switch you would adopt the new switch into the controller then copy the configuration from the failed switch over to the new one. 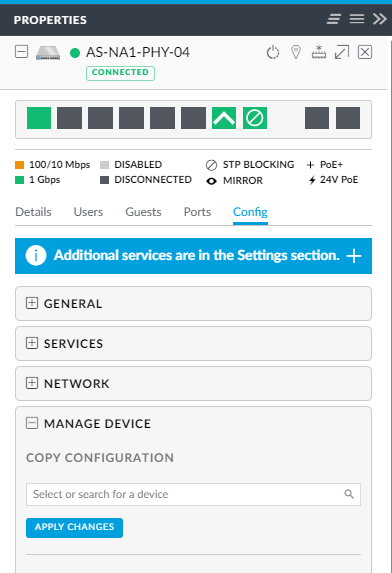 Once the new switch is back up and running you instruct the controller to ‘forget’ the old failed switch. I guess once the new switch has been adopted it will be discovererable by the copy feature.
Please note I’ve not tested replacement of either the USG or the Switch as I’ve not had a need to. I just wanted to know how to do it prior to one failing so I could write some simple work instructions on how to do so. It looks pretty simple.
I really like the controller based approach to configuration management of the Unifi devices. The Single pane of glass is nice to look at and cool that you dont need to deploy sepperate configuration management systems to backup the configs and monitor the devices. The controller can be configured to email alerts etc.
Connecting to the ISP modem
With all the operational stuff out of the way it was time to go live. The ISP modem was put into modem only mode and the USG received an IP from the ISP via DHCP on its WAN interface. Everything worked as expected except one thing was drastically different. Performance! using the ISP provided modem in router mode the best I could get prior to using the USG was around 160Mbps – 250Mbps down on a 350Mbps link. With the USG connected a speed test from a workstation connected to a LAN behind the USG was able to achieve over 350Mbps 🙂
 Something to note is the speed test function buit into the Unifi controller. It does not seem able to reach anywhere near the actual speed of my ISP link: I’m not sure why this is but its a bit misleading:
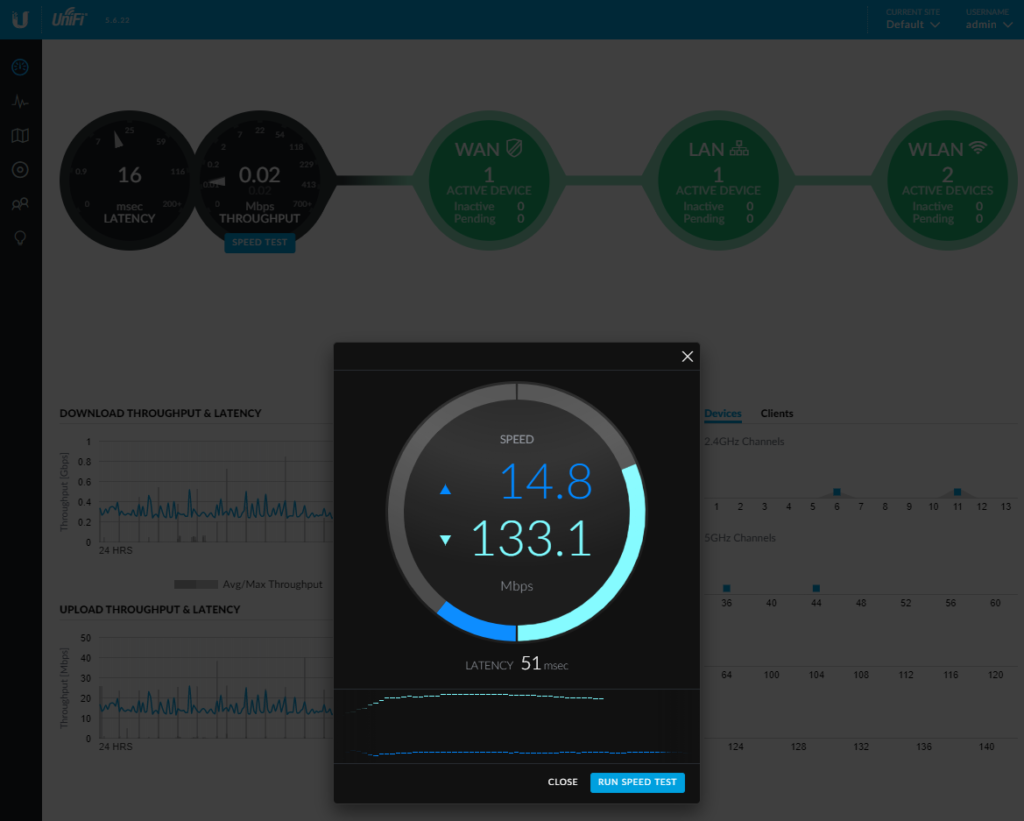
Don’t rely on the speed test utility on the controller. Test it yourself using a good browser or a speedtest App installed directly on your workstation.
Summary
Overall I’m very pleased with the result of Implementing Ubiquiti Unifi into the home network. Since installing the USG I’ve not experienced a single issue with my ISP link, not one.
I think the term sometimes used to describe Unifi devices ‘prosumer’ is correct at the present time. The controller software requires some more features and configuration options before I’d consider them for enterprise grade networks. They also need HA in the product line to enable multiple USG’s on the same site.
For a totally cool home network rig or SMB then the simple setup and ease of use via the beautiful controller software is awesome and highly recommended.